Saturday, January 30, 2016

Granny Chic a Week - Crochet and Fabric Coasters

Disclosure: Some of the links in this post are affiliate links, which means that if you go through them to make a purchase I can earn a commission.  But I only link to products that I recommend based on my experience with them, not because of the commission. :)

This week I decided to try out something I have been wanting to do for a while.  I love pairing different mediums, especially when it is yarn/cotton thread and fabric!

So this week, we are doing crochet and fabric granny chic coasters!


Here is what you need:


  • Scissors
  • Size 10 crochet hook 
  • Crochet thread
  • Quarter yard of fabric
  • Iron
  • Optional Variation - Upholstery needle to make a blanket stitch
How To Make Some Awesome Coasters:

Abbreviations:

Ch - Chain
Sl St - Slip Stitch
Sc - Single Crochet
Dc - Double Crochet

Grab your fabric and cut 4 rectangles (or however many coasters you would like).  I made mine about 4in wide by 8in tall.  


After you cut these out, press in each side about a 1/4in like so....


Then press in half so wrong sides are facing and all edges are turned under, like this...


Now you have 2 choices - you can either use your crochet hook to pierce through the fabric or you can do a blanket stitch around and crochet off of that.  I chose to pierce the fabric with the hook, so that is the tutorial below, but if you would prefer to do a blanket stitch, here is a great tutorial over at Red Brolly. (If you do this method, skip down to the singe crochet section.)

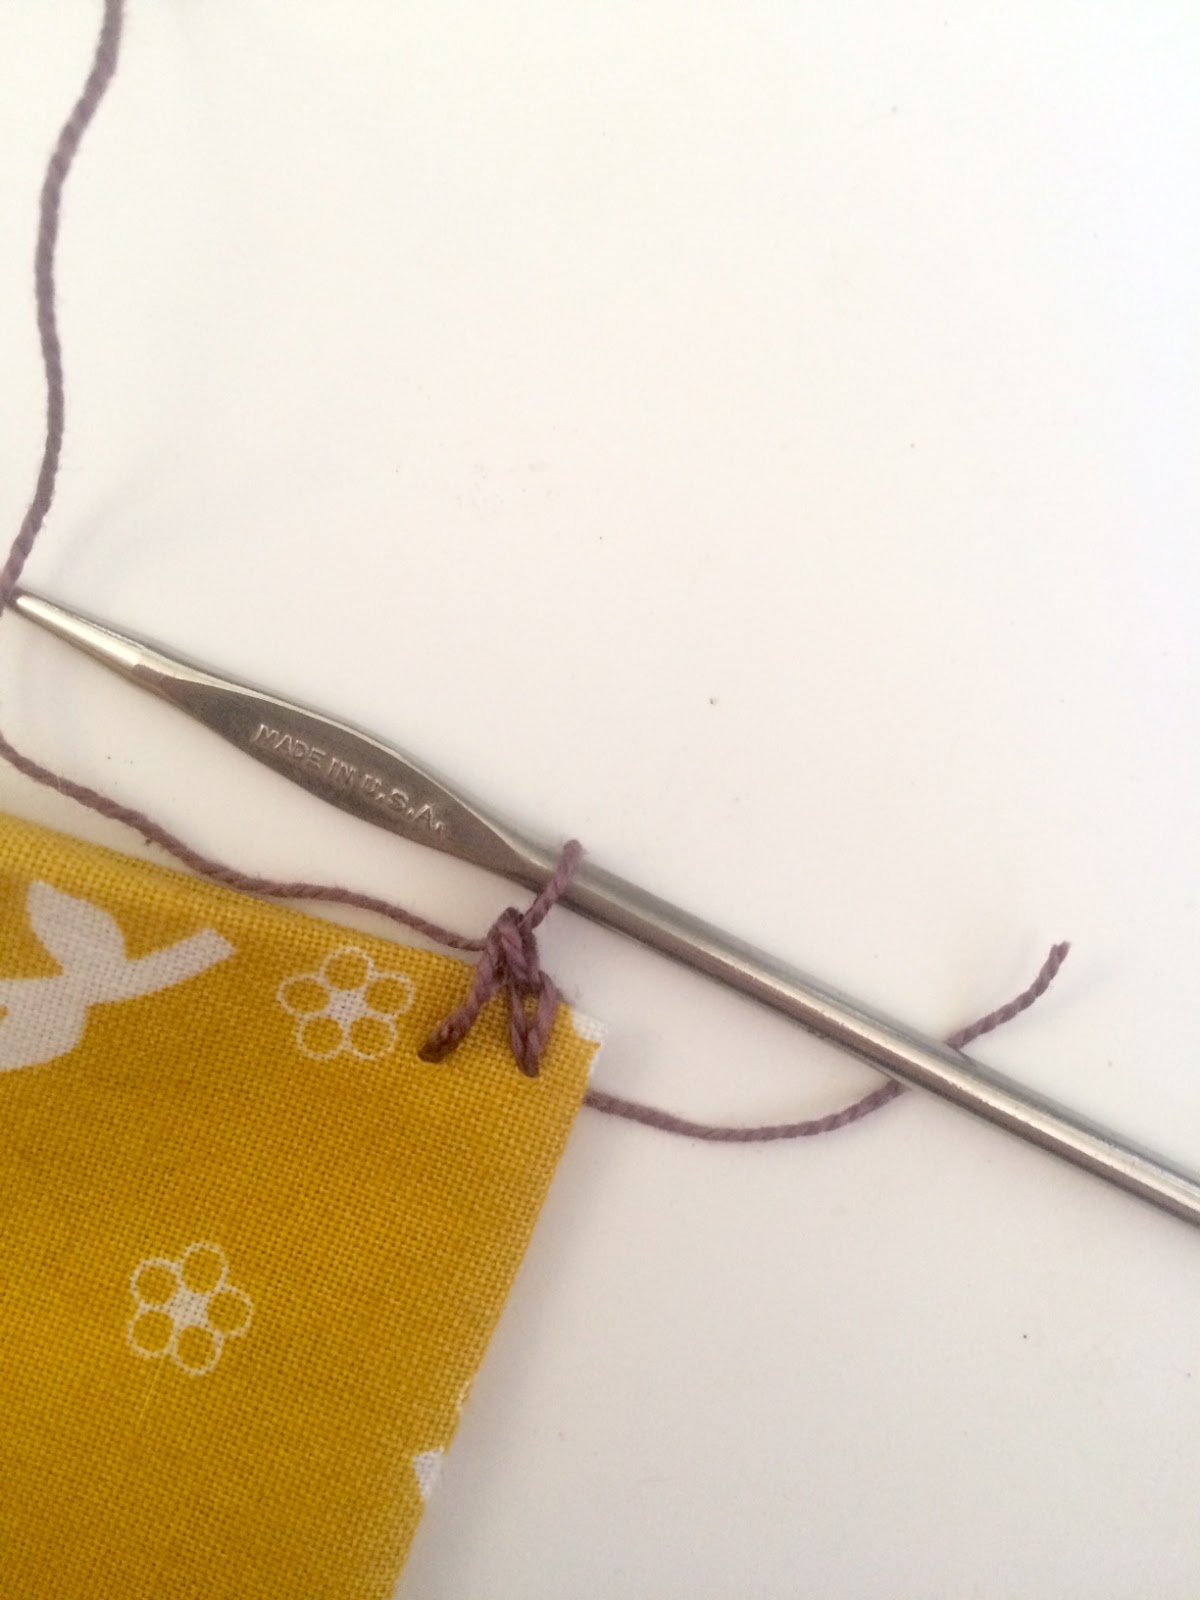
For those of you using the crochet hook, start near a corner and carefully press the hook through all layers of the fabric like so...


Next, hook your crochet thread and pull through, leaving the loop around your hook and pull enough through so it is even with the edge of the fabric so it doesn't pucker up.  Then wrap thread around hook and pull through, as if to slip stitch.  It will look something like this...


Continue like this.  Pierce through the fabric again about 1/8in away from the first one, pull loop through, making a long loop and slip stitch.


Also, beware silly kitties who want to attack your work...


I spaced it to where there are about 14 stitches on the sides (not including the corners.) When you get to the corner, chain one, insert hook back into the hole you pierced for your last stitch, sl st, ch 1 and then insert into same hole one more time, slip stitch and then continue across as you did before.


Once you have worked all the way around (or after you have you finished a blanket stitch around), ch 1 and sc across.  For the size I made, you will need to space 28 stitches across. (But if you want a larger square, the scallops are worked in sets of 4.  So increase or decrease your sc's across by 4 stitches.)

At each corner, ch 1 to turn the corner, and sc 28 across next side.


When you reach the end, slip stitch to join. Then sl st across 3 sc so you will start your first shell (or scallop) in the 4th stitch from the corner.

Ch 2 (will act as first dc), dc5 times into same hole. Sk 3, 6 dc into 4th hole.  Continue across, making 6 shells/scallops.


When you reach the corner (after your 6th shell), ch1, 6 dc into corner turn ch, and ch 1. Sk 3, and 6 dc into 4th hole from corner.  Continue in this fashion all the way around.


When you reach the last corner, join last dc with a sl st to the first dc (the 2 chains) and finish off.  Weave in ends.  And tada!  Your awesome new granny chic coasters!


PS - If you want to print this bad boy out, click here for a downloadable PDF.


Friday, January 22, 2016

Granny Chic a Week - Take Flight Quilt Collaboration with Birch Fabric

Disclosure: Some of the links in this post are affiliate links, which means that if you go through them to make a purchase I can earn a commission.  But I only link to products that I recommend based on my experience with them, not because of the commission. :)

I am super excited to tell you about this week's Granny Chic a Week project!  Admittedly, this would likely take more than a week to make.  But well worth it for the lovely end result!


So this week we teamed up with Birch Fabrics, who makes beautiful, organic fabrics, to create this herringbone quilt from their new line of double gauze fabric.  It is so wonderful against the skin, light and flowy, and super squishable as a quilt.  You will never want to get out of bed!

It is a fun quilt to make!  We hand quilted it with embroidery floss to keep it nice and fluffy and add that handmade touch!


This is where I am supposed to lay down, right?
You can download the full pattern (beautifully designed by the awesome folks at Birch Fabrics) here, as well as buy the ready to go quilt kit here!


We hope you enjoy this fun quilt as much as we do!  Make sure to share your finished quilts with us!  Tag #takeflightquilt when post to social media!

And a HUGE thanks to the awesome peeps at Birch Fabric for collaborating on this project! It was a blast!

Ash

Saturday, January 16, 2016

DIY Pom Pom Flower Bouquet - Granny Chic a Week

Disclosure: Some of the links in this post are affiliate links, which means that if you go through them to make a purchase I can earn a commission.  But I only link to products that I recommend based on my experience with them, not because of the commission. :)

Hey there!  Ok, ok...I am totally cutting it close for this week's Granny Chic a Week project.  But this one is a quick and easy one that will add a pop of color and never die!


This has been on my to-do list for YEARS! And now that it is done, I am loving it!

Here is what you need:


Pom poms.  These are ones that I made using the technique I talked about last week.  Check that out here.  This is an AWESOME way to use up those small balls of yarn from other projects!


You will also need some floral stem wire and floral tape.  You can find them at the links provided or at pretty much any craft supply store.

How to make your bouquet:

Once you have the pom poms made, this is super easy!

First, take some floral wire and carefully push it up through your pom pom.  Do this slow and support the pom pom so all your yarn doesn't come apart.

The cat has to sneak into every one of these tutorials....
Next, make an upside down 'V' with the wire.  We will carefully snake this back through the pom pom.


Carefully press the wire back through the pom pom, like below.  Pull slowly until it is just hidden in the fluff of the pom pom.  If you pull too hard, the strings will just pull out and ruin the pom pom.


Now you should have something that looks like this.  


Carefully peel off some floral tape and we will start wrapping...


Kind of pull up the yarn at the bottom to finish wrapping the wire.


Now you should have one completely flower!


Easy, right?  Now just repeat until you have your desired number of flowers for your bouquet, grab a cute vase, and display!  


Check back again next week for our next granny chic project! 

Ash

PS - If there is something you have seen but can't find a tutorial on, maybe I can help!  Let me know what granny chic project we should work on.  Or just share your project!


Thursday, January 14, 2016

My very own refurbished spindle spinning wheel!

Squee!!  Guess what I have!

My very own refurbished spindle spinning wheel!


Isn't it cool! It has a few little things that still need a little tweaking, but it's quite nice! 

Here is the before.  My parents found the wheel at a swap meet locally, but it did not have the mother of all, whorl or spindle.  

Loading up the new find from the swap meet.

We looked it up, and it looks like it very well could be a tradition Ashford wheel.  After buying just a few supplies, my dad was awesome and turned a brand new whorl and mother of all.  (The two tall posts that hold the spindle and whorl.)

How pretty did he make those?  I love them!

Newly custom hand turned whorl and mother of all posts...beauties!

We decided to start with a spindle spinning wheel.  It is a great way for us to modify this wheel to get something up and running and I am loving it.

Playing with the new wheel. Excuse the mess....

I am still getting the hang of it a little, but as soon as I jump off this computer, I am carding a bunch of fiber and getting to it!  Can't wait!  Thanks, Dad and Mom!

And I just have to add....this is how we roll.  There are ways to do things outside the box.  I didn't feel I could afford a brand new wheel, but I really wanted to have one.  Initially we were going to make this cute Thrifty Fox spindle wheel from these plans we bought on Etsy, but then happened upon this wheel in need of love.  So here is my little soapbox speech - If you want it bad enough, you make it happen.  It is okay to not have THE in-thing.  What matter is you are trying.  No regrets. Oh yeah, and it also helps to have awesome supportive people in your life. (In this case, the hubby and parents!)  So surround yourself with supportive people as often as you can. (Okay, stepping off the box now...thanks for listening.)

Stay tuned for some yummy yarn from my new toy!

Ash

Friday, January 8, 2016

Granny Chic a Week - Week One - Pom Pom Rug!


Disclosure: Some of the links in this post are affiliate links, which means that if you go through them to make a purchase I can earn a commission.  But I only link to products that I recommend based on my experience with them, not because of the commission. :)

Woo hoo!  We are super excited to kick off our new year's blog posts with our first installation of Granny Chic a Week!


Grab that yarn and start making pom poms! Here is what you will need:

Supplies:

  • Scissors
  • A piece of cardboard or scrap mail or a pom pom maker
  • Lots of yarn (I used up lots of stash balls, but my guestimate would be around 1500 yards)
Scissors, some scrap cardstock mail or cardboard, and yarn
  • Felt to finish the back completely a little larger than your final rug
  • Non-skid/rubbery mat (see below)
Non-skid backing/mat - you can also find this in the kitchen section to put in drawers
  • Hot glue gun and glue sticks

The How To:
Collect your supplies....

And start whipping up some pom poms!  I decided to make my rug 16in wide by 26in long, so I had to make 126 - 2in pom poms.   You can make these your preferred method if you have one, or this is how I make them:

 Grab your cardboard (or in my case, scrap mail) and cut or fold into desired size.  Mine is 2in.

2Start wrapping the yarn around the cardboard like this:


Continue to wrap the yarn for a bit.  You want it to be a thick, full pom pom, so wrap until it looks something like this:

Then you will cut a longer piece of yarn to tie it up with.  Lay the long piece on a surface and then carefully slide your wrapped yarn off the cardboard and set it on the long piece like this:

Next you will tightly tie the long piece around the center of the wrapped yarn.  Double knot.
Now to grab the scissors.  Insert the scissors into the loops on either side and snip.
You will now have something that looks like this:

Keeping a hold of the long strings (do not cut these off - they will be used later) give the pom pom a haircut to its desired size and shape....


And tada!  Your pom pom!

After you make enough pom poms (admittedly, you kind of have to love this to make this many...) then you will start tying them on to your latch hooking backing, making sure to place close enough that there are not gaps where you see the rug.  For my 16x26in rug, I had 14 rows of 9.


Take long strings and use them to tie the pom pom to the rug backing
Here you can see some holes I need to fill.  I made mine lots of fun colors, but you could do all one color, or do an ombre look or stripes...have fun with it!

 Once you have them all tied on how you like, trim the long pieces down on the back...

And then cut a piece of felt or backing to the size of your rug. 


Plug in the glue gun and start gluing!   I left a little extra along the edges so I could wrap the felt up and around the rough edges of the latch hook backing.


Just one last step! Grab your non-skid backing (mostly just needed if you have hard wood floors) and add a bit to the back.


And voila!  Your fun rug is all done!  So squishy on the feet and so cute to look at!


It would be great for a kids room, or you could go crazy and make a large circle for your living room.  The possibilities are endless!

We hope you have fun and enjoy this Granny Chic project!

Ash

PS - Here are outtakes with kitties who were really very curious about my photography....